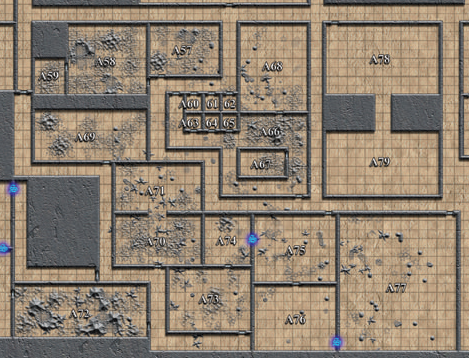
WLD Region A
| Stargate: Underground | |
|---|---|
 | |
| Dungeon Master | |
| Adam | |
| Exploration Team | |
|
Xiao Xing - Team Leader (Chinese) Jasmine Finch - Medic (American) Marja Broznawski - Weapon Specialist (Polish) Lance Sargent - Systems Engineer (American) Eurydice - Cultural Relations (Alien) | |
| Mission Clock | |
| 2 days, 2.5 hours | |
| Expedition Notes | |
| Region A | |
| Expedition Resorces | |
| Weapons - Survival - Recovered | |
| Extras | |
| House Rules - Bestiary |
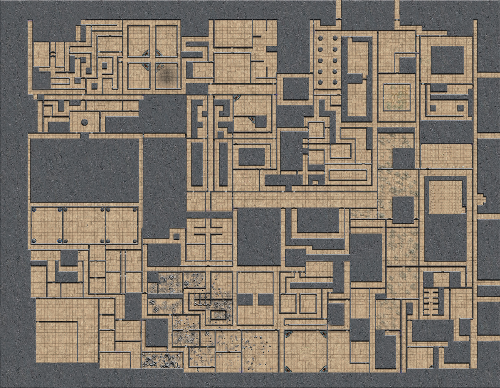
Unless otherwise noted, all rooms and hallways in region A are constructed of stone, with a clean and polished floor, with occasional, seemingly decorative, lines inlaid. Walls are smooth stone, but without the reflective polish and occasionally decorated with cuts in addition or instead of the inlaid lines. Both are strongly resistant of scratches and normal wear and tear, but can be chipped or cracked by weapons or demolition tools. Most rooms have a little dust on the floor, but in an amount that belittles the time that has passed.
Unless otherwise noted, all of the doors are smooth metal sliding doors with an interlocking split in the middle. A sensor panel, smaller then the ones used on Atlantis, are located on the side of each door (usually on the right.) When unpowered, the doors can be moved with a reasonable application of strength and have a neutral tracking (neither opening or closing on their own) When powered, forcing the door open physically is exceptionally difficult. Doors will open when the sensor is triggered, then close again automatically as soon as the person has passed through (or after a reasonable amount of time has passed. Individuals with an ATA gene can cause the doors to "lock", preventing the sensor on the other side from opening the door. "Secret" or hidden doors consist of nearly indistinguishable section of the normal stone wall that rotates on a central axis, allowing a person to slip through on each side. The latching and opening mechanism are ATA activated - physically forcing the door is difficult, but not impossible.
Unless otherwise noted, there is no light (ambient or emitted) in any of the rooms. There is, however, an integrated ventilation system that seems to be moving and/or refreshing the air in the facility, though with varying effectiveness. The facility stays at a consistent 58 F (14.5 C), with no indication of any day/night cycle. While the construction seems to have been designed to minimize the travel of echos, the stone surfaces and mostly empty rooms cause sound to carry unpredictably. This makes it hard to determine direction or nature of noises more then one or two rooms over.
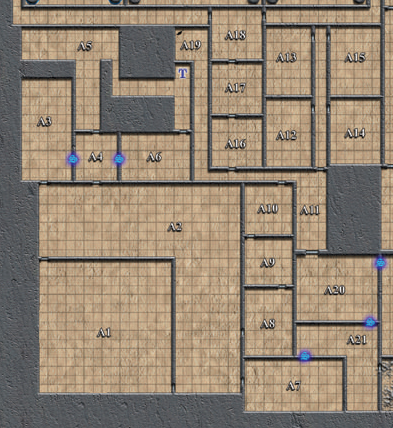
The Near-Gate Area (Rooms 1 to 21)
Base Camp
- Room 1: A clean, empty stone room similar in size to a decent ballroom or event space (75ft by 75ft by 15 ft). The room's most distinctive feature is the Stargate, which appears to be slotted or built directly into the wall. The gate appears to be unpowered, and investigation (with destruction tools) has shown the gate to be a unique design similar to a Space Gate, with no accessible external ports. The actual door in this room, leading further into the structure, have had their door locks re-energized and activated, allowing any member of the team to provide manual commands (they also respond to ATA).
The room is currently strewn with camping gear and other equipment provided to the exploration team through the Stargate. Also in the room is a DHD, which appears to have been carried in through the gate by another party, who later discovered there was no way to plug it into the gate. The ventilation in the room seems to work quite well and must be isolated, as the rather harsh smells from the adjoining room are undetectable while the doors are closed.
Body Dumps
- Room 2 This large L-shaped room has a few human bodies dumped in the corner. The tracks make it look like they were being dragged/carried to Room 3 when the disposers gave up and just dropped them in a pile. The bodies show signs of dying by piercing or slashing weapons.
- Room 3 The main feature of this room is a tripped pit trap who's reset function has been long damaged. It appears to have been used as a waste and body dump sometime in the recent past. (And the expedition has continued to use it as such.)
Storage Rooms
- Rooms 4, 5 and 6: This rooms and hallways contain a large number of supplies and tools. The quality of the tools and workmanship are comparable to a number of pre-industrial societies across the Pegasus Galaxy. The tools appear to be of the kind used for underground exploration, tool/furniture maintenance, mining, and stoneworking. The condition of the supplies suggests a significant passage of time, somewhere between one to six months depending on the condition they were in when they first arrived. All the food sacks have been completely overgrown with some kind of black mold.
- Hallway T: Some kind of acid projection trap of unknown design. Fires on the first person to enter the hallway, coming from the northern side, then remain idle for about 2 minutes.
Eastern Rooms
- Room 7: This peculiar room is entirely filled with a rich, musky smell. Bits of dried grass, as well as larger chunks of debris, lay all over the floor as if a tornado recently tore through a meadow.
- Rooms 8, 9, 10: These rooms are all empty, save for a couple of dead bodies. Room 9, however, marked the first encounter with the "Darkmantles."
- Room 11: This hallway is empty and unremarkable save for the presence of an unusual skeleton - that of a short reptilian humanoid. It shows evidence of being full grown (despite standing only about 3.5 feet tall) and of having been picked clean by one of the rat swarms found throughout the explorations.
- Room 20 and 21: These rooms show signs of having been inhabited, including stools, benches, tables and a bed. The furniture all appears to be of pre-industrial workmanship. Most easily portable items have already been removed, leaving only a couple of hidden forks, knives along with a deck of cards.
North-Eastern Quad
- Rooms 12 to 15: These four rooms, along with the hallway that connects them, are completely trashed. It seems likely that these were once used as the base camp for the previous expedition before they moved on. The rats (both regular and gigantic) have ravaged and decimated everything inside, using the remaining material as both food and nesting.
- Rooms 16 to 18: These three rooms are almost completely empty save for dust and minor debris from passing humanoids and creatures. This area also marked the first encounter with the "Stirges." these three rooms also serve as the only way to move on to the area to the north.
- Room 19 This isolated, dead-end corridor appears to have served as the secondary sewage dump for when the previous expedition was still based out of this area. The smell alone was enough to identify it's function.
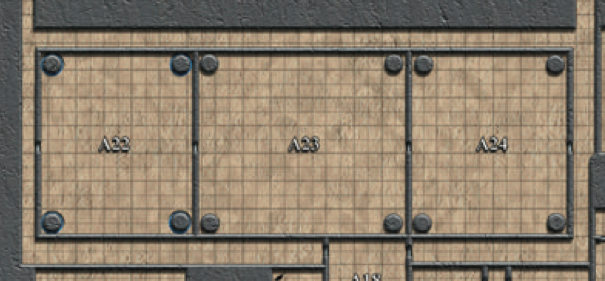
Meditation Chambers (Rooms 22 to 24)
These three rooms are all particularly large and have slightly domed ceilings. The floors, walls, and ceilings of each of the rooms are all finely decorated with designs and sayings to help guide and provide the right meditative atmosphere.
- Room 22: The four pillars in this room are each cut with very particular groves to allow for a small flow of water to descend while producing a musical and meditative white noise. A small pool at the bottom of each pillar collects the falling water and would, if the lights were active, provide a rippling light effect. The system is apparently still connected to the facility's internal plumbing, at least enough to keep the fountains from drying out due to splashing or evaporation. Each pillar maintains about 10 gallons and can restore itself at a rate of 1 gallon every 12 hours. This room is occupied by Bragdor, who has turned it into his home. The horror-shocked human Turag moved in with him after the team rescued him from Room 28.
- Room 23: The four pillars in this room are equipped with ATA-controlled hologram projectors, allowing the visualization of nearly anything the controlling individual can remember or imagine. Multiple individuals could, in theory, work in concert to create more complete and complex images.
- Room 24: The four pillars in this room create some kind of sound dampening field, akin to the active noise cancelation used by some headphones. The system was designed and the assumption that its occupants were being reasonably quiet already, and can't fully compensate for loud noises like shouting.
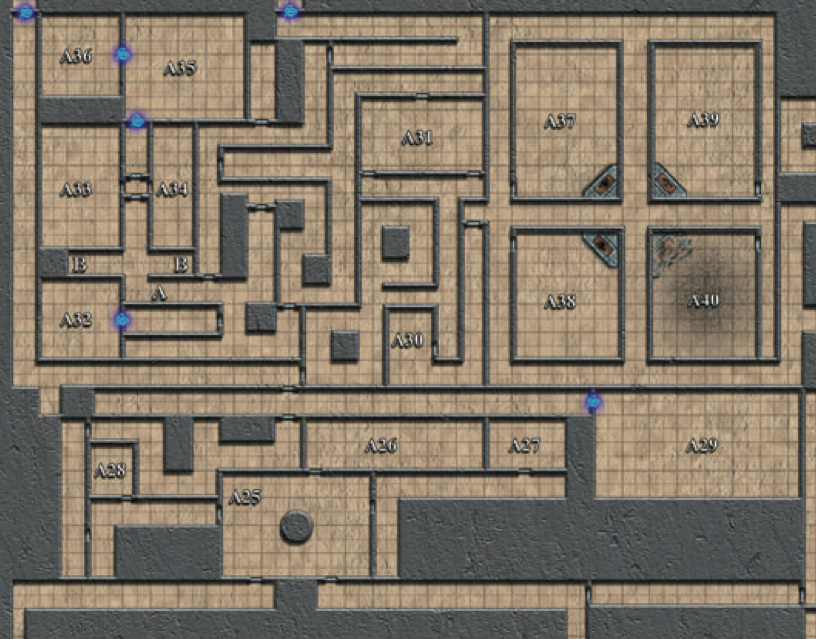
The Maze (Rooms 25 to 40)
Southern Block
- Room 25: A giant pillar dominates the center of this room, marked up with a series of glyphs intended to warn off intruders that have completely obliterated whatever decorations it had originally. Scattered around the room are several bodies showing signs of being killed by the Darkmantles and starting to be fed upon by the oversized rats.
- Room 28: This small side room was empty save for a single pathetic individual, the human Turang. After the team talked with him, he relocated to Room 22.
- Rooms 26, 27 and 29: Unexplored
Unexplored
- Rooms 30 to 40: This area is unexplored.
Earthquake Damage (Rooms 57 to 77)
All of these rooms show signs of extensive earthquake damage, with some sunken floors and lots of collapsed material from the ceilings. The lack of any serious damage to the walls (except in room 72) is a testament to the exceptional quality of construction and strength of the rock.
Hazard Rooms
- Room 72: By far the worst room you've encountered, it shows signs of subsidence, roof collapse and infill from the outer (southern) wall. Trying to move more than a couple feet into the room would require removing backpacks and crawling through unstable rockslide. A few scuff marks and footprints of the child-sized humanoids show minor, brief exploration.
- Rooms 70, 71 and 73: These rooms all show signs of earthquake damage, requiring at least some scrambling over dust, pebbles, and rocks fallen from the ceiling. They are otherwise empty and unremarkable, save for the single technological device (Lamp) found in room 73.
Noteable Rooms
- Room 74: This room shows signs of having had some rough (pre-industrial) furniture in it prior to the roof collapse. More interestingly, faint images could be made out on the wall, which seemed to be of idealized landscapes that included some distinctive earth landmarks. A few proverb-like sayings were written in Lantian near the ceiling. Of more immediate concern was the stone 'secret' door on the western wall, which has been jammed closed by over a dozen chisels and picks wedges.
- Room 69: This room shows signs of having been used as some kind of guard station or barracks prior to the earthquake. Most of the furniture is smashed, though three chairs and a weapons rack remain. All show signs of having belonged to the shorter humanoids.
Unexplored Rooms
- Rooms 59 to 68 and rooms 75 to 77
